Simply Bubbly Header Tutorial
Simply Bubbly Header Tutorial
Click on the image below to download the IMF file in zip form for incredimail.
All images used have been obtained through yahoo groups. If you know of the artist/copyright information, please let me know so I can give proper credit.
Simply Bubbly Tutorial
Level - Advanced
(assumes knowledge of PSP and its inner workings)
Items Needed:
PSP (done in X but any version will do)
Graphic of Choice (mists may not work)
DSB Flux Plugin
Simple Plugin
Accent of your choice (compliments graphic)
Ready? Let's Get Started!!
Preparation:
1. Resize width of graphic to no longer than 400 pixels. Height will self adjust.
2. Duplicate twice. Minimize one.
3. Pick light and dark color from graphic.
There are two parts to this tutorial. We will be working on the background first.
Background:
1. Seamless Tile: default settings
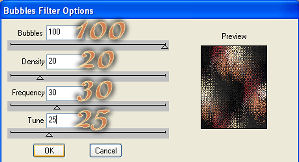
2. DSB Flux: Bubbles (see screenshot for settings)
3. New Layer
4. Floodfill with light color. Bring opacity down to be text friendly (usually around 40 - 60 depending on color used.)
5. Layers: Merge All
6. Seamless Tile: Default
7. Duplicate. Minimize for use as pattern later.
8. Bring opacity down again, to about 40 - 60 (depending on color used) to make text friendly.
9. Merge: Merge All.
10. Export: Jpeg Optimizer. Close image.
Header:
1. Maximize the second duplicated graphic.
2. Add Border - 2 pixels in light color.
Magic Wand - Select Border.
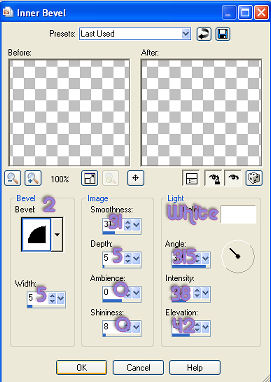
Inner Bevel (see screenshot for settings)
3. Selections - Invert
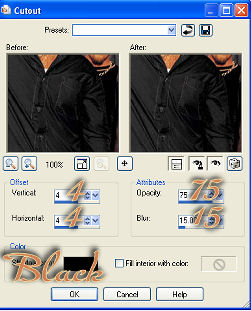
Effects - 3D Effects - Cutout (see screenshot for settings)
Repeat with -4 for Vertical and Horizontal, keeping the rest the same.
Selections - Select None.
4. Add Borders - 10 pixels in white.
Magic Wand - select border.
Change foreground to pattern.
Select background image from earlier.
Angle - 30, Scale 50.
Floodfill selection with pattern.
Effects - 3D Effects - Inner Bevel (same settings)
Selections - Select None.
5. Add Borders - 2 pixels in dark color.
Magic Wand - Select Border.
Effects - 3D Effects - Inner Bevel (same settings)
Selections - Select None.
6. Add Borders - 15 pixels in white.
Magic Wand - Select Border.
Floodfill with pattern.
Image - Mirror
Image - Flip
Layers - New Layer
Floodfill with dark color.
Bring opacity down to 50.
Merge Visible.
Selections - Select None.
7. Add Borders - 2 pixels in light color.
Magic Wand - Select Border
Effects - 3D Effects - Inner Bevel (same settings)
Selections - Select None.
8. Add Borders - 20 pixels in white.
Magic Wand - Select Border.
Floodfill with pattern.
Image - Mirror
Effects - 3D Effects - Inner Bevel (same settings)
Selections - Select None
9. Add Borders - 1 pixel in dark color.
10. Copy and Paste Accent as New Layer.
Resize if necessary.
Place in upper left corner of image.
Effects - 3D Effects - Drop Shadow:
3, 3, 70, 10, Color of choice.
Repeat with -3, -3, 70, 10, Color of choice.
Simple - Top Left Mirror.
Click Ok.
11. Layers - Merge All.
12. Apply Watermark.
13. Export - Jpeg Optimizer.
14. Assemble in LC!
I hope you like this tutorial. I want to thank all the testers at Joy4EH_Ladybug_AllStarTesters for testing this out for me! You Ladies Rock!!!
Please link back to me:
Thank You!!!!
