Pinwheel SB Tutorial
Pinwheel SB Tutorial
Click on the image below to download the imf file for incredimail in zip form.
All images used have been obtained through yahoo groups. If you know the artist/copyright information please let me know so I can give proper credit

Pinwheel Side Border
Level - This is for those that have a working knowledge of PSP.
Items Needed:
Tube of Choice
Graphics Plus - Pinwheel
Preparation:
1. Open tube - resize to no higher than 250 pixels. Duplicate twice.
Minimize one. Close original.
2. Pick a light and medium color from tube.
Background:
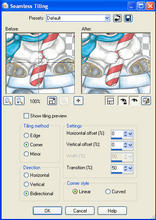
1. Use second duplicated image. Effects - Image Effects - Seamless Tiling
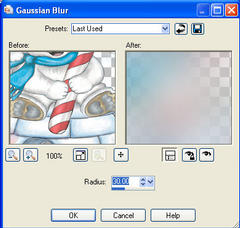
2. Adjust - Blur - Gaussian Blur
3. Layers - New Raster Layer
4. Flood fill with light/medium color. Layers - Arrange - Send to bottom.
5. Layers - Merge - Merge Visible.
6. Effects - Plugins - Graphics Plus - Pinwheel
7. Apply Pinwheel again.
8. Layers - New Raster Layer
9. Flood fill with light color. Lower opacity to around 40, give or take, to make text friendly.
10. Layers - Merge - Merge All.
11. Apply the same Seamless Tiling as before.
12. Minimize.
Side Border:
1. Open new image 1024 X 350 pixels.
2. Change foreground to pattern and find the image we just created (Angle - 0, Scale - 100) Flood fill with pattern. Apply seamless tile with default settings.
3. Restore minimized tube. Edit - Copy. Minimize. Resize tube height to no higher than 325 pixels.
4. Edit - Paste as New Layer.
5. Move to left side (see my image for placement).
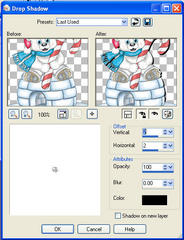
6. Effects - 3D Effects - Drop Shadow
You may use any drop shadow you choose
to, but I used the following:
7. Apply Drop Shadow again but use - 2 for Vertical and Horizontal. (If you used
your own drop shadow, be sure to do the negative for your vertical and horizontal.)
8. Layers - Merge - Merge All.
9. Apply text as desired under tube. I used Brandyscript and applied same drop shadow as tube.
10. Layers - Merge - Merge All.
11. Put watermark info on image.
12. File - Export - JPEG Optimizer.
13. Save.
14. Assemble in Letter Creator and your done!
Be sure to link back to:
Big thanks to Joy4EH for teaching me all she knows!!! Love ya girl!!!
Thanks to JM Creations for helping me get this site up and running!!!
