Artistic Sponge Side Border Tutorial
Artistic Sponge SB
Click on tutorial example to download zip of IMF and any supplies. Feel free to print the tutorial out for your personal use.
Artistic Sponge SB Tutorial
This tutorial was written for those on the intermediate level or higher, which means that you have knowledge of where things are in PSP and its inner workings.
Items Needed:
Tube of Choice
Plugin: Artistic (Sponge)
Be sure to put the plugin in your plugins folder in PSP before opening PSP. Otherwise, the plugin will not work.
Ready? Let's Create!
1. Open tube. Resize height to no more than 275 pixels. Duplicate tube (shift D) and close original. Edit - Copy. Pick a light and dark colorfrom tube.
2. New Image. 1280 by 300 pixels.
3. Selections - Select All. Edit - Paste into selection. Select none.
4. Image effects - Seamless Tiling. Default settings.
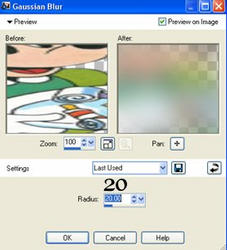
5. Blur - Gaussian Blur with the following settings:
6. New Layer. Send to bottom. Floodfill with dark color. Merge visible.
7. Plugins - Artistic - Sponge with the following settings:

8. Repeat Seamless Tiling with default settings.
9. Paste as New Layer. Move tube to left. Drop Shadow with following settings:

10. Layers - New Raster Layer. Flood fill with light color. Bring opacity down to make text friendly.
11. Merge Visible. Put any text you'd like on it, if any.
12. Apply watermark and save as jpg.
13. Put in Letter Creator and your done!!!
I hope you liked this tutorial.
Please link back to:
Thanks to all my testers at LBC All Star Testers and CCC Testers!!! You Rock!!!